At last the fusion furnace is complete! The 3D printable parts are on thingiverse and can be freely downloaded of course.
In this post I will put some instructions to build the furnace, so it will be a bit long. Note that almost everything is 3D printed. You just need some nuts and bolts, some tubes and a couple of connectors (of course also glue, putty, sandpaper and paint).
At the bottom of this post you will find links to the non printable parts and to the models on thingiverse.
At the bottom of this post you will find links to the non printable parts and to the models on thingiverse.
Let's start with the printing tips...
Every part to be printed has in the name also the count if you need more than one. I printed everything using ABS, but other materials should be fine. Just few parts need supports and you should be able to print them almost on every printer as I tried to keep the parts withing 20cm .
For the light screen I used white filament. I also tried a clear one, but the result didn't satisfied me, so I used the white. It's quite thin, so the light inside is surely visible.
Everything else is black ABS. Anyway I sanded and then painted most of the parts, so it's not really important what color is the filament.
Every part has been printed with a 0.3mm resolution, 2 perimeters (0.8mm) and 15% infill.
The base
It's made of 4 parts that should be glued together. I printed them upside-down and with supports for the pins where the smaller tubes will be inserted.
There are small holes where you can put short pieces of 1.75mm filament to keep the parts aligned if you wish.
This is what you will get:

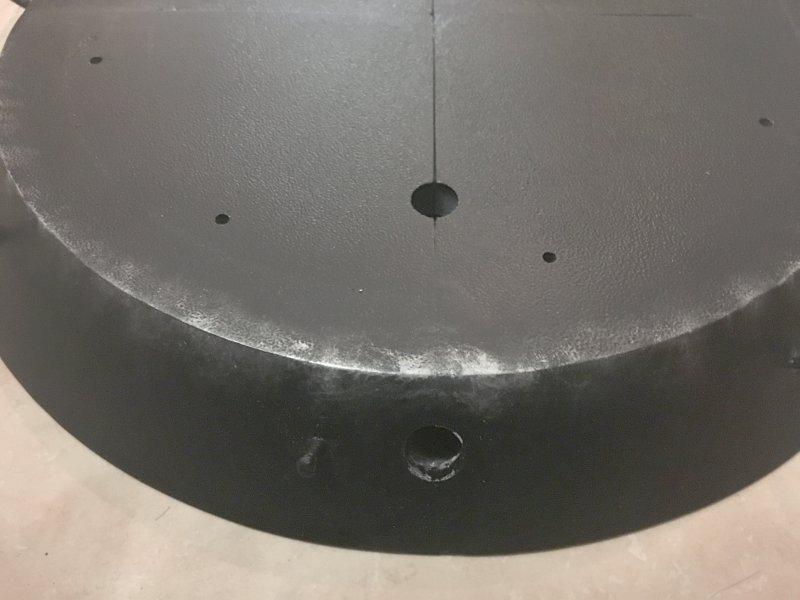


You can also see the holes where the power connectors will go and where you can insert the wires. The holes for the nuts and the bolts are also visible. You need 8 M3x40mm bolts and the corresponding nuts.
The base ring
Again a 4 parts object. This will be attached to the base using the bolts. The 4 parts also have small holes for alignment pins. The 4 parts doesn't need any kind of support.


The power connectors and the leds holders
I put two connectors in the furnace. In my mind one is used to connect to a real power supply (12V) and the other should connect to the droid. As the two connectors are just wired together, they are interchangeable and it doesn't matter which one you connect to the supply or to the droid.
The two connector holders may need some support (depends on which orientation you print them), The led holders needs nothing. For every led holder you need 4 leds. I chose yellow leds, but you are of course free to chose another color if you wish.
Every group of 4 leds should be connected in series and the 4 groups are connected in parallel. I used 180ohm resistance for every group, but maybe it's a bit too high as the light is not so bright. Probably 150ohm or 120ohm could be better.
These are the connectors:


Note that the "umbrella" of the two holders is not completely flat (these are the only two parts that I printed at higher resolution). To insert them correctly they must be put with the small tip pointing up.
These are the leds holders:


The leds are 5mm yellow, even if in the photos they just seem green... In the last photo you can see the whole "circuit" inside the furnace.
The body and the light screen
All the rings forming the body are easy to print. Anyway some small support should be used. The bottom and the top rings can be printed without any support (the top one should be printed upside-down to avoid the supports).
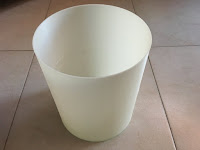
The light screen is probably the easiest part to print. You need to print it two times and glue them together. The seam is barely visible and will be hidden beside the rings. As I used ABS I glued all the parts using acetone. In any case it would be a good choiche to not use an instant glue, so you have the time to adjust the placement of the parts.
Here is the screen. Note the seam in the second photo:

These are all the rings glued together:


The top and the details
This is the last multipart object. As usual you can find the holes for the alignment pegs. I got a good result without using supports, but the 4 parts can be problematic for some printer, so you may need to print with some kind of support.
The details are easy to print and none of them need supports to be printed, but you should print the tube inserts rotated 90 degrees.
When everything has been printed, sanded and painted you can glue the details to the top.


Then you can just put the whole top in place:

The coils
This is one of the parts that cannot be printed. I used 11 pieces of 1mm copper wire. Every piece is about 90cm long.
I winded the wires on a pen, but any cylinder about 1cm diameter will be fine. After winding it I modeled by hand to get more or less the right shape. You don't really need to be perfect in this step.
After the coils are ready you can insert one end inside the wire cap that will be placed on a connector and the other end should be inserted in the specific hole in the top.


In the last photo you can see all the coils in place.
The big tubes
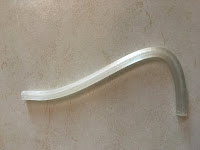
When I started building the furnace I bought some silicone tube for these parts, but no matter what I tried, I couldn't get the right curves. At the end I just decided that printing that tubes was the best solution and I was right.
I printed them using a clear filament and I didn't need any support by rotating them 90 degrees. They came out great and I really like them.
The only drawback is that it's easier to break something...
To put them in place I insert the top first and then the bottom. Please note that the bottom end should not be inserted too much. About 1mm is more than enough.


The small tubes
These are not printed as the bigger ones. The rubber tube I found was perfect, so I had no need to make them printable.
These tubes are about 19cm long, but I think that they can be shorter without any problem. The tube that I bought was clear, but I was lucky enough because it was paintable. Note that some of these tubes are just unpaintable, so if you can find a black one it's surely a better choiche.
You need to print one small connector for every tube. This connector will be inserted in the base ring.


Now the fusion furnace is complete! Here is the result:


This is the list of the non printed parts. I bought everything on Amazon Italy, but it should be easy to find them elsewhere:
The M3x40 bolts - https://amzn.to/2GKeaDg
The power connectors - https://amzn.to/2GJ07O8
The copper wire - https://amzn.to/2Ve558X
The small tube - https://amzn.to/2E3Z87A
If you wish to try also a silicone tube for the bigger ones, this is what I tried: https://amzn.to/2Ea2JkD
I have to warn you that the copper wire that I bought was not 10m long a stated, but actually less than 9m, so I had to buy two to make all the 11 pieces.
Finally the printable parts on thingiverse: https://www.thingiverse.com/thing:3447859
The base ring
Again a 4 parts object. This will be attached to the base using the bolts. The 4 parts also have small holes for alignment pins. The 4 parts doesn't need any kind of support.


The power connectors and the leds holders
I put two connectors in the furnace. In my mind one is used to connect to a real power supply (12V) and the other should connect to the droid. As the two connectors are just wired together, they are interchangeable and it doesn't matter which one you connect to the supply or to the droid.
The two connector holders may need some support (depends on which orientation you print them), The led holders needs nothing. For every led holder you need 4 leds. I chose yellow leds, but you are of course free to chose another color if you wish.
Every group of 4 leds should be connected in series and the 4 groups are connected in parallel. I used 180ohm resistance for every group, but maybe it's a bit too high as the light is not so bright. Probably 150ohm or 120ohm could be better.
These are the connectors:


Note that the "umbrella" of the two holders is not completely flat (these are the only two parts that I printed at higher resolution). To insert them correctly they must be put with the small tip pointing up.
These are the leds holders:


The leds are 5mm yellow, even if in the photos they just seem green... In the last photo you can see the whole "circuit" inside the furnace.
The body and the light screen
All the rings forming the body are easy to print. Anyway some small support should be used. The bottom and the top rings can be printed without any support (the top one should be printed upside-down to avoid the supports).
The light screen is probably the easiest part to print. You need to print it two times and glue them together. The seam is barely visible and will be hidden beside the rings. As I used ABS I glued all the parts using acetone. In any case it would be a good choiche to not use an instant glue, so you have the time to adjust the placement of the parts.
Here is the screen. Note the seam in the second photo:


These are all the rings glued together:


The top and the details
This is the last multipart object. As usual you can find the holes for the alignment pegs. I got a good result without using supports, but the 4 parts can be problematic for some printer, so you may need to print with some kind of support.
The details are easy to print and none of them need supports to be printed, but you should print the tube inserts rotated 90 degrees.
When everything has been printed, sanded and painted you can glue the details to the top.


Then you can just put the whole top in place:

The coils
This is one of the parts that cannot be printed. I used 11 pieces of 1mm copper wire. Every piece is about 90cm long.
I winded the wires on a pen, but any cylinder about 1cm diameter will be fine. After winding it I modeled by hand to get more or less the right shape. You don't really need to be perfect in this step.
After the coils are ready you can insert one end inside the wire cap that will be placed on a connector and the other end should be inserted in the specific hole in the top.


In the last photo you can see all the coils in place.
The big tubes
When I started building the furnace I bought some silicone tube for these parts, but no matter what I tried, I couldn't get the right curves. At the end I just decided that printing that tubes was the best solution and I was right.
I printed them using a clear filament and I didn't need any support by rotating them 90 degrees. They came out great and I really like them.
The only drawback is that it's easier to break something...
To put them in place I insert the top first and then the bottom. Please note that the bottom end should not be inserted too much. About 1mm is more than enough.


The small tubes
These are not printed as the bigger ones. The rubber tube I found was perfect, so I had no need to make them printable.
These tubes are about 19cm long, but I think that they can be shorter without any problem. The tube that I bought was clear, but I was lucky enough because it was paintable. Note that some of these tubes are just unpaintable, so if you can find a black one it's surely a better choiche.
You need to print one small connector for every tube. This connector will be inserted in the base ring.


Now the fusion furnace is complete! Here is the result:


This is the list of the non printed parts. I bought everything on Amazon Italy, but it should be easy to find them elsewhere:
The M3x40 bolts - https://amzn.to/2GKeaDg
The power connectors - https://amzn.to/2GJ07O8
The copper wire - https://amzn.to/2Ve558X
The small tube - https://amzn.to/2E3Z87A
If you wish to try also a silicone tube for the bigger ones, this is what I tried: https://amzn.to/2Ea2JkD
I have to warn you that the copper wire that I bought was not 10m long a stated, but actually less than 9m, so I had to buy two to make all the 11 pieces.
Finally the printable parts on thingiverse: https://www.thingiverse.com/thing:3447859
No comments:
Post a Comment